third grade
Youtube Video Links -
History - youtu.be/hZ-AYcDpODY Demo - youtu.be/xTrg71846MM
History - youtu.be/hZ-AYcDpODY Demo - youtu.be/xTrg71846MM
Modigliani style self-Portraits
Amedeo Modigliani (1884 - 1920) was an Italian portrait painter whose pictures are notable for the use of long necks and simplified features. Portrait painters usually portray their models with noble and serene expressions, but the faces in Modigliani's paintings appear sad. He did not try to portray his subjects realistically, instead using more simplified and decorative details in his work. He also used very few colors, and he did not soften the colors or shapes with much shading. This gives a flatter, more abstract appearance.
The figures Modigliani painted have oval faces, long cylindrical necks, and almond-shaped eyes. His painting and sculpture reveal his interest in black African art, which is also created with simplified shapes.
The figures Modigliani painted have oval faces, long cylindrical necks, and almond-shaped eyes. His painting and sculpture reveal his interest in black African art, which is also created with simplified shapes.
Notice how Modigliani paints the eyes in his portraits. Especially in his later work, Modigliani often left the eyes of his portrait subjects blank. You might think that would leave the people without personality or appearing vacant, but Modigliani use the tilt of the head or the curve of the nose to convey so much. Many art critics comment on how Modigliani is capable of revealing a lot about the sitter while at the same time concealing something from us as well. This feature makes us spend more time looking and pondering, and I think it makes the paintings more interesting too. His paintings are both expressive and mysterious.
The Project
Prep – 45 min. (included time to make sample)
Print – Modigliani, Gypsy Woman with Baby
Materials
12 x 18 piece of black construction paper for each student
White crayons
Oil pastels for each student (the larger boxes of pastels will offer more skin color choices for your students)
Lesson
Print – Modigliani, Gypsy Woman with Baby
Materials
12 x 18 piece of black construction paper for each student
White crayons
Oil pastels for each student (the larger boxes of pastels will offer more skin color choices for your students)
Lesson
- Talk about Modigliani print. Ask them what they notice is different in his portraits from others they have seen? Go over history of artist and art form.
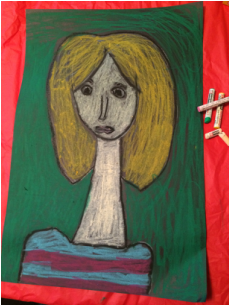
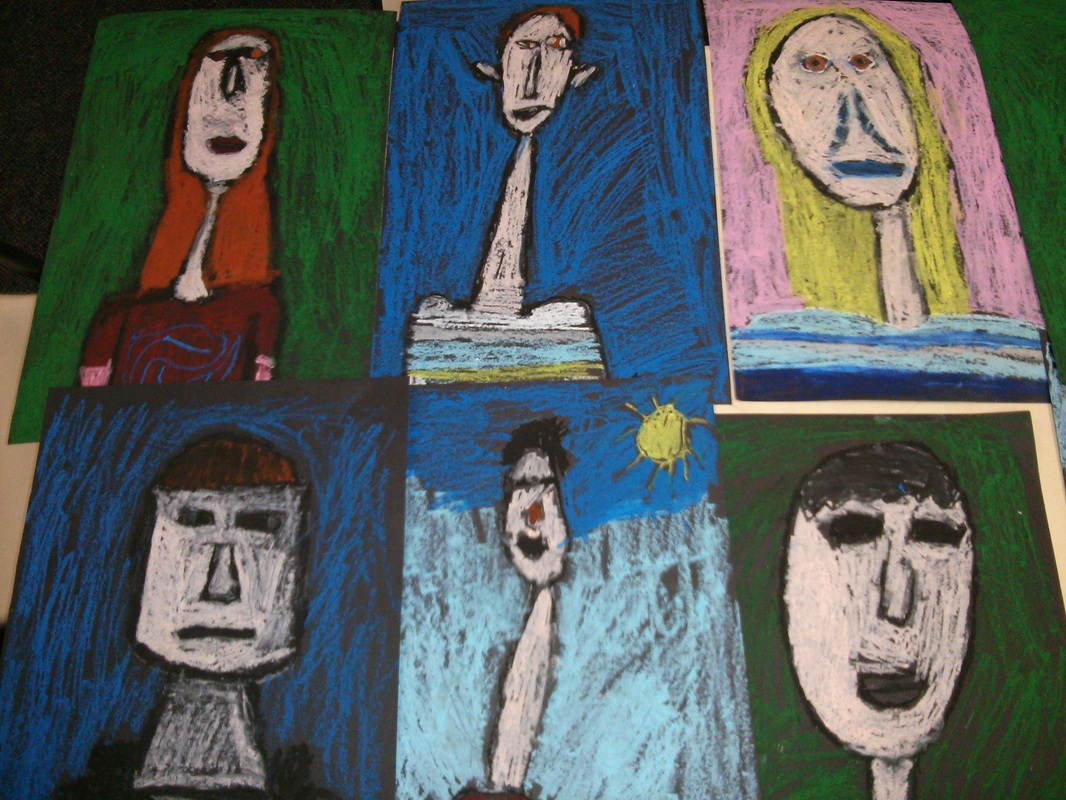
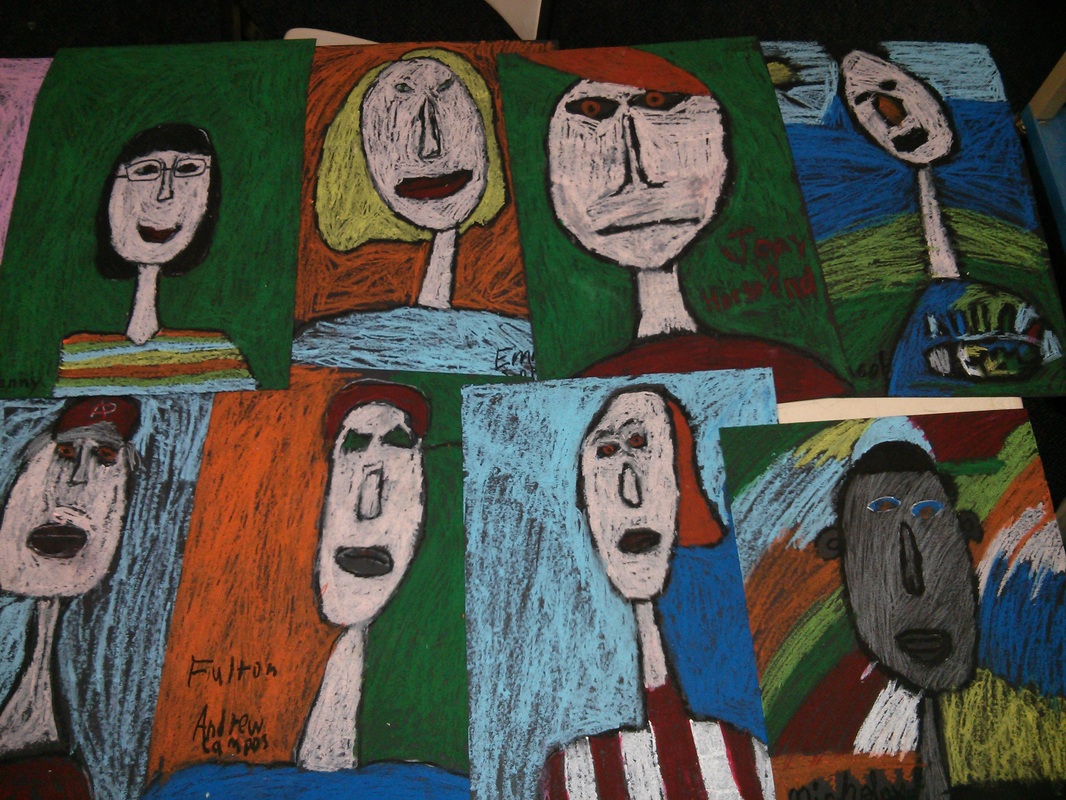
- Explain that today they will be creating their own Modigliani self-portrait. Ask them how their features will be different? Long neck, long oval face, long nose.
- Explain that the oval for the head will be drawn at the top of the paper to make room for the long neck and shoulders.
- Go over where facial features will go on their face. Draw a long oval face on the white board and show them where the eyes will go. Remember, eyes are an almond shape, with 2 round shapes in center. The round shape in center of eye is pupil and it is black. The round shape the pupil is in is the iris and this is the colorful part of their eye. Remind them to add eyebrows.
- The nose will be longer. It can be drawn by using lines on the side and nostrils at the end.
- Lips are just the shape of the mouth with a line in the middle. Modigliani usually had closed mouths, so they can draw theirs closed for this portrait.
- Draw ears if your ears are seen.
- Draw a long neck down to the shirt they are wearing.
- Model a basic drawing for the students using a white crayon on the black paper and following the rules you just explained.
- Show the students how they will trace over their white crayon drawing with a black oil pastel.
- When the white crayon and black oil pastel are done it is time to color in the drawing with oil pastels.
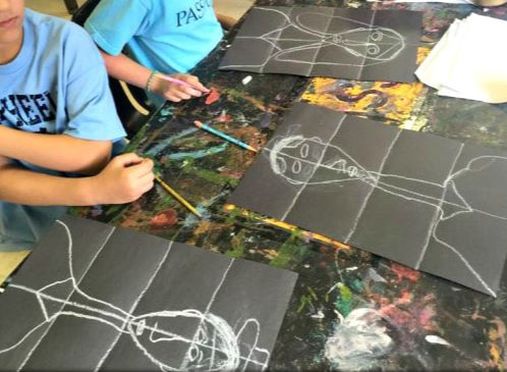
TIP: I found another site who does this project by folding the paper into helpful gridlines. The shoulders fill the bottom portion, the neck the section above that, and the head takes up much of the top two sections. Great idea!
Idea and photo credit: https://youngartlove.wordpress.com/2015/05/13/self-portraits-modigliani/
Idea and photo credit: https://youngartlove.wordpress.com/2015/05/13/self-portraits-modigliani/
Art Project
-Pass out black paper and white crayons to each student.
-Students can draw in pencil first on black paper if they want and then trace over with white crayon.
-when students are done drawing with their white crayon, have them raise their hands so a parent volunteer can check to make sure they have drawn everything.
-pass out oil pastels to each student
-have students draw over their white crayon with their black oil pastel (some of the white crayon should show)
-students can now start to color in their drawings.
-encourage students to color darkly to show the bright colors of the oil pastels and cover up the black paper
-students can choose a bright color to use for their background
-when students are done, make sure they put their oil pastels back in the box correctly and slip lid on
Citations:
- Unknown, Photograph of Amedeo Modigliani 1887-1920), www.wikipedia.org, https://en.wikipedia.org/wiki/Amedeo_Modigliani
- Amedeo Modigliani, .Jeanne Heuterne with Hat and Necklace 1917. www.wikiart.org, https://www.wikiart.org/en/amedeo-modigliani/jeanne-hebuterne-with-hat-and-necklace-1917
- Amedeo Modigliani, Portrait of a Woman, 1910. www.wikiart.org, https://www.wikiart.org/en/amedeo-modigliani/portrait-of-a-woman-1
- Amedeo Modigliani, The Boy 1918. www.wikiart.org, https://www.wikiart.org/en/amedeo-modigliani/the-boy
- Amedeo Modigliani, Portrait of a Young Girl, 1910. www.wikiart.org, https://www.wikiart.org/en/amedeo-modigliani/portrait-of-a-young-girl-1910
- Amedeo Modigliani, Alice, 1915. www.wikiart.org, https://www.wikiart.org/en/amedeo-modigliani/alice-1915
