second grade
Cubist Self Portrait
|
The word "cubism" sounds like it might be about cubes or blocks (kind of like Minecraft maybe?), but it is actually a style of art that was started by Picasso (and his friend Georges Braque) in France in 1907. Picasso wanted to try something really different in art, and he was less concerned with making something look perfectly real, and more interested in something deeper or more elemental.
For cubism, Picasso would look at an object then try to ABSTRACT or simplify the object to its most important parts, and sometimes the resulting simple shapes would indeed look like cubes, but they might also look more like triangles or other geometric shapes or fragments. Once he simplified the object, he would break it apart into sections, so that he could consider each part of the object separately. One thing he was really interested in was being able to show the object from different perspectives at the same time (like the front, back and top all at once!), so he would take many different segments of his simplified shapes and put them back together in a carefully crafted arrangement, kind of like a puzzle. |
The main ideas of cubism include:
1: simplifying the structure of an item or person to the most elemental forms or shapes 2: breaking apart, or fragmenting, those simplified shapes. 3: reconstructing those forms based on different viewpoints at the same time. |
Notice how these examples of faces by Picasso are broken up into fragmented planes of color and shape, showing some parts of the body from the front, some from the side, some even from the top or back. They try to show you lots of details that you wouldn't normally be able to see at the same time, all the while simplifying things so they are not overly detailed or complicated. While earlier cubism purposefully eliminated most color so it could focus on form (see the "Portrait of Pablo Picasso" from 1912 in the slide show above), later cubism introduces lots of color to make the pictures more lively and playful. Other forms of cubism would also come to include collage, adding in actual bits of newspaper, tickets, wallpaper, labels or other items to add another dimension to the images (see the 1st grade project: Guitar Collage).
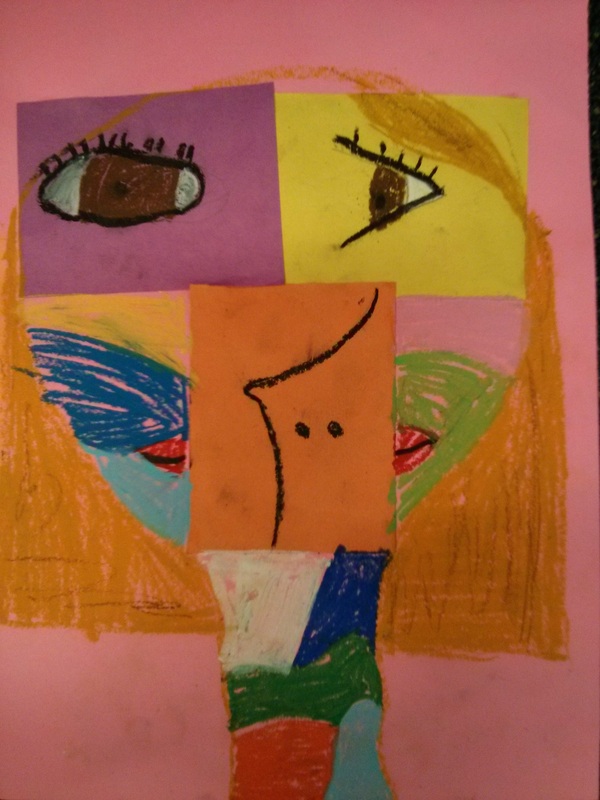
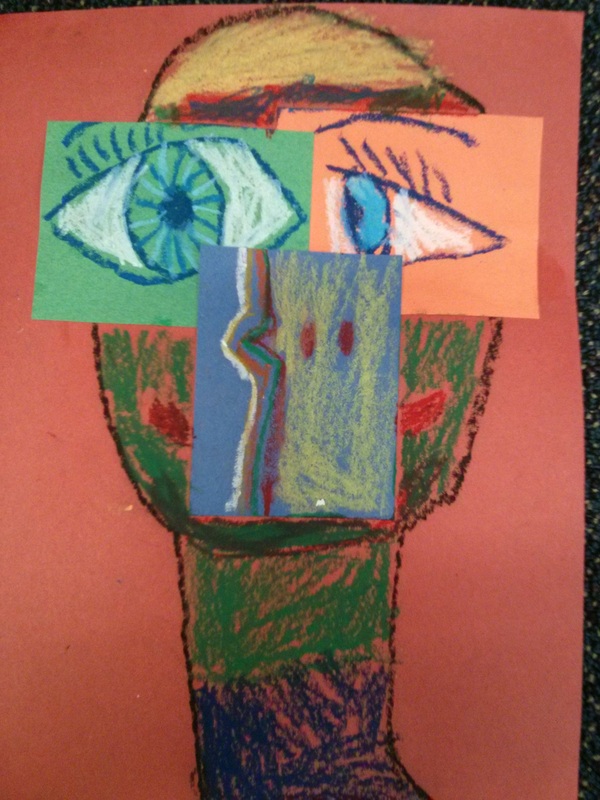
For this project the students will be making a cubist style self-portrait. When the cubist artists were painting their portraits they were actually representing real people. Remind the students that when they are creating their self portraits they will be drawing themselves, even though it might look a bit funny. Have them pay attention to the parts of their face that make them unique. What color are their eyes (or what color do they wish their eyes were)? What style and shape is their hair? Do they usually wear a hair bow? glasses? jewelry? a hat? Most second graders simplify body shapes by nature, so they are the perfect age for this project.
For this project the students will be making a cubist style self-portrait. When the cubist artists were painting their portraits they were actually representing real people. Remind the students that when they are creating their self portraits they will be drawing themselves, even though it might look a bit funny. Have them pay attention to the parts of their face that make them unique. What color are their eyes (or what color do they wish their eyes were)? What style and shape is their hair? Do they usually wear a hair bow? glasses? jewelry? a hat? Most second graders simplify body shapes by nature, so they are the perfect age for this project.
|
PowerPoint presentation you can use for your lesson:
|
| ||
The Project
The Project
Prep - 30 min (includes making sample)
Print - Pablo Picasso, Portrait of Dora Maar
Materials:
9x12 colored construction paper
3 - 3x4" rectangles of three other colors, construction paper
box of oil pastels + black crayon for each student
glue
Project:
1. On the white board, draw examples of three things: a forward facing, almond-shaped eye; a side facing eye; and a simple line nose. The students will use a black crayon (it doesn't smear like the pastels, but a black oil pastel can also be used) to draw each of those items, one on each of their small colored rectangles. Remind them how Picasso showed different sides of a figure at the same time. Also how he simplified things (like their nose). They can draw them in any orientation they choose, but they should be directed to fill up their small paper as much as possible.
Note: I had a couple of students who refused to make the eyes different (they insisted both eyes be front facing because they could not reconcile showing two perspectives at the same time). Encourage them to follow the guidelines, but don't make a big deal of it.
2. They can then use the oil pastels to color in the eyes (they don't even need to be the same color, but they may also choose to reflect their own eye color if they want), add eyelashes, eyebrows, etc. If they wear glasses, it is better to add these later, when the eyes are glued to the face, rather than at this point.
3. With the black crayon (or black oil pastel), draw the shape of a head and neck on the 9x12" paper. They can also draw shoulders and the top of their shirt if desired.
4. Using a glue stick, have the students glue their eyes and nose in the appropriate places on the head. They will probably stick out of the boundaries of the face, but that is okay. They can also be overlapped, or even trimmed a little if desired.
5. Using the oil pastels, the students should draw in their mouth, ears and hair to reflect the way they look. Perhaps they may also consider adding hair bows, earrings, necklaces, etc. if those are things they usually wear. Glasses can be added at this point too.
6. As a final step, the students should use different colors to fill in the spaces left on the face. If the spaces are large, they can be broken up into smaller segments or patches of colors. The background should be left blank.
7. Make sure the student's name is on the back.

Citations
- This.Usually.Works, Rommel's HQ in Normandy-P8301346 2014. www.flickr.com, https://www.flickr.com/photos/catzrule/15239953712/
- George Braque, Castle at La Roche Guyon 1909. www.wikiart.org, https://www.wikiart.org/en/georges-braque/castle-at-la-roche-guyon-1909
- Pablo Picasso, Child with Flower 1945. www.wikiart.org, https://www.wikiart.org/en/pablo-picasso/child-with-flower-1945
- George Braque, Fishing Boats 1909. www.wikiart.org, https://www.wikiart.org/en/georges-braque/fishing-boats
- George Braque, Houses at Estaque 1908. www.wikiart.org, https://www.wikiart.org/en/georges-braque/houses-at-estaque-1908
- Pablo Picasso, Portrait of Dora Maar 1937. www.wikiart.org, https://www.wikiart.org/en/pablo-picasso/portrait-of-dora-maar-1937-2
- Pablo Picasso, Square du Vert-Galant 1943. www.wikiart.org, https://www.wikiart.org/en/pablo-picasso/square-du-vert-galant-1943
- Pablo Picasso, Untitled 1938. www.wikiart.org, https://www.wikiart.org/en/pablo-picasso/untitled-1938-4
- Pablo Picasso, Untitled 1939. www.wikiart.org, https://www.wikiart.org/en/pablo-picasso/untitled-1939-2
