First Grade
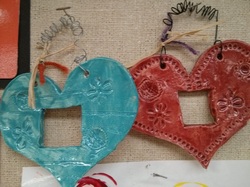
Clay - Heart Frames
Jim Dine (born 1935) is an American artist known for simple depictions of common objects. This makes him part of the Pop Art movement (see also Pop Art projects on Warhol, Lichtenstein and Jasper Johns). One of the frequent subjects in Jim Dine's art was hearts. He once said he made a "million" of them! He liked using hearts because they were a personal and passionate symbol. He painted them, sculpted them, drew them and made prints of them. He is probably best know for his work in printmaking.
When asked about why he was so fascinated with hearts, Jim Dine said that he had "no idea, but it's mine and I use it as a template for all my emotions. It's a landscape for everything." He said it is something "very simple" that can be built up to something more complicated. He continued: "Within that you can do anything in the world. And that's how I feel about my hearts."
The Project - Clay Heart Frames
Prep
– 2 hours (for one person, more helpers = less time)
Print –
Materials
White clay rolled out slab to fit heart cookie cutter for each student
2 copper cookie cutters
Clay cotton cloth pieces, one per student
Wire clay cutter
Plastic knives to cut out square for picture
Buttons, lace, etc. to press into clay
Straws to make holes at top to hang frame after firing
Wire to hang frame when done with firing and glaze
Glaze, you choose colors, I usually give students 3 choices
Volunteer Prep
Clay is our most time consuming project for each grade level. It does take time, but this project will last forever and is worth it!
Choose a day when other parents can come and help you roll out the clay. You can roll it out before the lesson or up to 3 days before the lesson.
Roll out a ½ inch piece of clay for each student that the copper heart cookie cutter will fit on. It is easiest to roll the clay on a piece of cotton cloth found in the drawers near the freezer. Each student will be given a slab of clay rolled out on the cloth.
Steps
-put a piece of moist (not wet) cloth down on the granite clay cart.
-Use wire cutter to cut a piece of clay off of clay block.
-lay on moist cloth, put another moist cloth over it and use rolling pin and wood measuring guides to roll out clay to desired thickness and size for heart frame.
-repeat!
-you can place each rolled out slab of clay on a cloth in a large Ziploc bag.
-I lay 3 pieces of rolled out clay, each with a cloth on the bottom, on top of each other in bag. If you are rolling out clay 2-3 days in advance, seal bag when you are done.
-always make extra slabs and a couple extra hearts in case some break in kiln!
Lesson
Explain to students that they will be working with clay today. This is white clay and it comes from the earth. It will make their hands feel dry, that is normal.
Show students the different items they will get to press into the clay.
Give each student a slab of clay and let them get started pressing objects in to make impressions.
When they are done have parent volunteers assist students to use copper cookie cutters to cut out heart. Parent volunteers then use plastic knives to cut a square in center so a student picture can be taped behind when clay is done.
Ask teacher for a class list with student numbers. Have a parent volunteer use a tooth pick to put the student number on the back of their heart.
Have a parent volunteer use a straw to create 2 holes on either side of the heart so that wire can be put through for hanging when it is complete.
Use class list to record what color the students want their heart glazed.
Have parent volunteers rinse out clay clothes and hang to dry on the rolling carts in Picture Person Art Room.
Put all extra clay in a bag, squash it down and place back in art room.
Firing
-after the clay has dried for a minimum of 2 weeks, then follow the clay firing steps listed on the clay cabinet.
-parent volunteers must load the kiln and call a kiln helper to turn it on, then unload the kiln.
Glazing
-parent volunteers then glaze the pieces and load the kiln again for their second firing, then unload kiln.
-pieces should now be done and you can put wire on them and get them wrapped up and back to teacher to hand out.
-teachers usually like to give this as a Mother’s Day project (you get to pick your glaze color, ha, ha).
-see if teacher will have pics of kids to put in frame or if you have a parent volunteer that will take pictures and get them printed to go in frame.
Thank you! I know this is a big job!
WARNING: DO NOT ALLOW CLAY TO GO DOWN YOUR DRAIN!
For more information on working with clay, see our media page on clay.
For more information on working with clay, see our media page on clay.
