Kindergarten
Native American Dolls
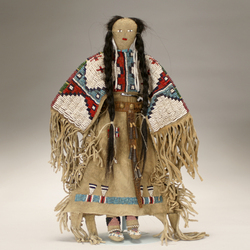
Just as modern day children play with dolls, so too did Native Americans. Their dolls were often created out of items the mother readily had on hand because they were the ones creating the dolls. Cornhusks, pine needles and other types of all natural fibers were highly popular. Mothers knew that the dolls would get lost or damaged, which led them to using products without a lot of meaning or expense.
Dolls created by the Native American people also had a spiritual significance and connection to the tribe at large. The dolls were dressed in traditional garb and used to tell a story to young girls. It was the way they learned about the heritage and history of their people. Modern day Native American artists still use this same process today. Their dolls are meant to show the work of their tribe and the history of their people by using clothing similar to those worn by the actual tribes. The dolls also contain spiritual elements such as beadwork that mimics the ancient symbols for the Great Spirit or embroidery that contains hidden symbols for the animals revered by these people.
Dolls created by the Native American people also had a spiritual significance and connection to the tribe at large. The dolls were dressed in traditional garb and used to tell a story to young girls. It was the way they learned about the heritage and history of their people. Modern day Native American artists still use this same process today. Their dolls are meant to show the work of their tribe and the history of their people by using clothing similar to those worn by the actual tribes. The dolls also contain spiritual elements such as beadwork that mimics the ancient symbols for the Great Spirit or embroidery that contains hidden symbols for the animals revered by these people.
the Project
Prep – 45 min.
Print –
Materials
1 brown paper bag per student (in kinder file cabinet drawer)
1 circle face traced with 4" cardstock circle stencil (students will cut out)
1 large feather per student
Pencils with erasers from cabinet E
3 bright colors of tempera paint in small paint palettes
Black thin strips of construction paper to use as hair
Glue bottles (in classroom)
Lesson
-pass out bags to students and have them put their names on back (the side without the flap)
-pass out the circle for students to cut out and draw face on. Have them raise their hand when they are ready to glue on their face and give them a glue bottle.
-pass out feathers and hair pieces to the center of each table and have students glue feather first (they may need help with this) and then glue hair pieces on top of feather.
-when students are done with face, hair, and feather, have them raise their hand and pass out a little paint palette and pencils to them (students can share these)
-tell students that each color has its own pencil so that the colors don’t get all mixed up, so check the eraser and see what color it has been dipped in and only use that color.
-stamp the necklace and belt on their puppet bag.
-clean up supplies, wipe off pencil erasers and put them back in basket, save any leftover hair pieces and circle faces in a bag and put them in file cabinet drawer.
Print –
Materials
1 brown paper bag per student (in kinder file cabinet drawer)
1 circle face traced with 4" cardstock circle stencil (students will cut out)
1 large feather per student
Pencils with erasers from cabinet E
3 bright colors of tempera paint in small paint palettes
Black thin strips of construction paper to use as hair
Glue bottles (in classroom)
Lesson
- Talk to students about importance of Native American Indians to our country. Show students print and ask them what they see: feathers, necklaces, etc.
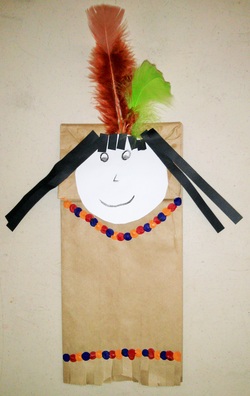
- Show students paper bag art sample and show them how they will create their own native American puppet today.
- Go over parts of art project: first put name on back of bag, second they will cut their circle out and draw a face on it, then glue it to top of bag.
- Show students how you will then glue on a feather and then hair on top.
- Show students how they will use then end of an eraser to make the necklace and belt on their bag puppet by dipping the eraser in the paint and stamping it on bag. Then using a different color and eraser stamp again and put next to their first stamp. Model this for students, as this will be a new concept for them.
-pass out bags to students and have them put their names on back (the side without the flap)
-pass out the circle for students to cut out and draw face on. Have them raise their hand when they are ready to glue on their face and give them a glue bottle.
-pass out feathers and hair pieces to the center of each table and have students glue feather first (they may need help with this) and then glue hair pieces on top of feather.
-when students are done with face, hair, and feather, have them raise their hand and pass out a little paint palette and pencils to them (students can share these)
-tell students that each color has its own pencil so that the colors don’t get all mixed up, so check the eraser and see what color it has been dipped in and only use that color.
-stamp the necklace and belt on their puppet bag.
-clean up supplies, wipe off pencil erasers and put them back in basket, save any leftover hair pieces and circle faces in a bag and put them in file cabinet drawer.
