third grade
Mondrian compositions
Piet Mondrian (1872-1944) was a Dutch artist who liked things nice and orderly (he was a bit of a control freak), and the world around him was more like chaos (there was a great big messy war - WWI - and most of the other artists were responding to it by expressing their feelings through vibrant color and distorted images). Mondrian wanted art to be more like him, rational and precise. Mondrian wanted art to be more like MATH!
So, Mondrian created a style based on pure geometry. He used only straight lines and rectangles (harmony and order), and the primary colors - red, blue and yellow (the most basic and pure) - along with three noncolors - white, black and gray. Mondrian then carefully calculated the placement of these elements to achieve what he called a "balance of unequal but equivalent oppositions."
So, Mondrian created a style based on pure geometry. He used only straight lines and rectangles (harmony and order), and the primary colors - red, blue and yellow (the most basic and pure) - along with three noncolors - white, black and gray. Mondrian then carefully calculated the placement of these elements to achieve what he called a "balance of unequal but equivalent oppositions."
Mondrian called this style "De Stijl" (pronounced duh STEHL), which means "The Style" because he was trying to achieve something universal, that no matter a person's language or nationality, you could understand the pure order of visual mathematics. And although his grid paintings look similar, each one is precisely - and differently - balanced. They are also completely abstract, without any reference whatsoever to objects in nature.
Mondrian is recognized for his attempts to eliminate feeling and emotion from art. His style is so easily identifiable that it became a symbol for modern art. Have the students comment on Mondrian's art. What do they think about it? Does it look easy to make? The rules are simple, it's true, but wait until they try to figure out their own arrangement of shapes and colors and they will find out it takes a good eye to make the work seem "right" and balanced. Not to mention being so perfectly precise with all the lines and angles.
Mondrian was so interested in controlling his environment that he even transformed his own house into one of his paintings. He covered his studio walls with rectangles in primary colors of gray, white and black, and he eliminated most of the furnishings to just the most basic and spare. He painted all of this furniture white or black, and he painted his record player bright red! Mondrian was so consistent in adhering to his "rules" that for the simple tulip flower in a vase in his room, he painted the leaves white since green wasn't a primary color and not permitted.
the project
Prep – 45 min. (includes making sample)
Print – Piet Mondrian, Composition #2
Materials
8 x 8" white construction paper for each student
9 x 9" black construction paper (to mount finished product on)
Yellow, red, and blue tempera paint
Black construction paper strips cut ¼ inch and 10 inches long (8 strips per kid)
Paint brushes
Paint palettes (small ones)
Water containers
Rulers

Lesson
* NOTE: In this project we are trying to make our images as much like the inspiration pieces as possible. We want the kids to make their pictures very much in the style of Mondrian. That is why they will be following Mondrian's own rules of straight lines and primary colors.
1. Show students some pictures of compositions by Mondrian. Talk about what they see: straight lines, squares and rectangles, blocks of color. Go over Mondrian's ideas about why he painted his works this way. Talk about math and geometry. Teach the term "geometric" (regular shapes like squares, triangles and circles). Mondrian only used squares and rectangles.
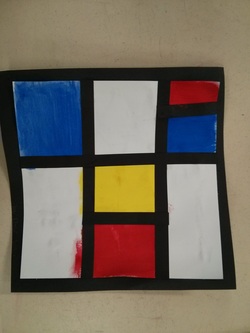
2. Show students the sample you made. Remind them that their name goes on the back of the black paper, which will be handed out when they are ready. Talk about how you drew the lines in pencil first with a ruler to make sure they were straight. Point out that some areas can be left large and some can be divided into smaller rectangles. Emphasize that the squares should not be too small (or when they add the black strips there will be no color left), and that a simple grid is very effective in this case. There is no need to get too complicated with their design (though many will be tempted).
3. Remind them of the term "primary colors," which they should have learned in earlier grades. Tell them that, like Mondrian, they will only use the primary colors of red, yellow, and blue in their art today. Point out how important the white squares are in the design. Show how you left white squares on your own sample, and ask them to think about which squares they will leave white on their own grid.
4. Demonstrate how to glue on the strips of black paper over your pencil lines when you were done painting, to outline the grid (remind them to use the glue: "dot, dot, not a lot"). Show them they can cut the strips if they are too long for their lines.
Art Project
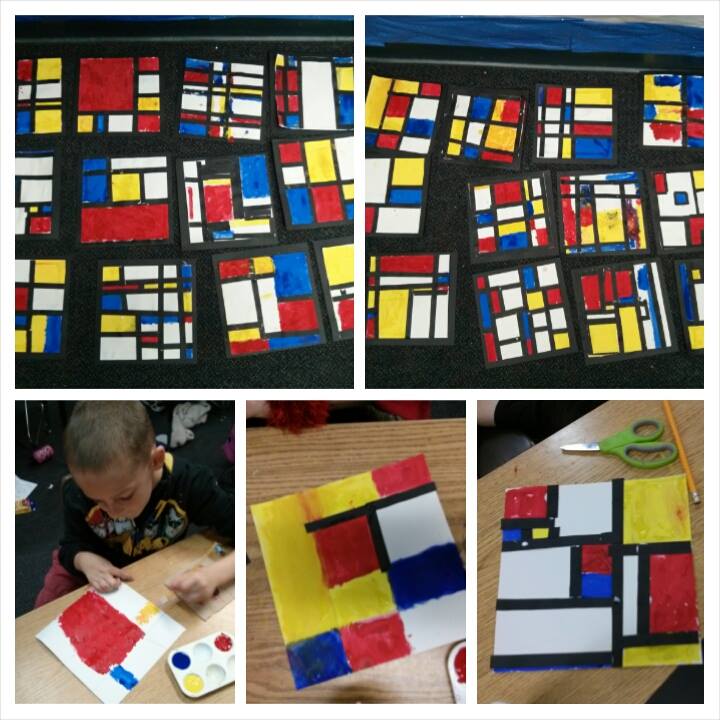
-pass out white paper to students and rulers
-have students use their ruler and their pencil to draw straight lines going up and down and across their paper.
-as they are drawing their lines remind them to think about what squares they want to paint.
-have students raise their hands when they are done with their pencil lines.
-have parent volunteers check to make sure they followed the directions (parents may want to erase a line or two if the student has been a bit too ambitious or have created shapes that just wont work).
- pass out paint palettes with primary colors and a paint brush and water container to kids that are ready to paint
-students can share paint palette and water containers
-have students raise their hand when they are done painting so parents can remove paint supplies
-pass out black paper strips for students to glue down over pencil lines. Remind students that the strips do NOT need to go around the outside edge because you will be mounting the painting on a black square
-pass out glue bottles to glue down strips
-trim any strips that go beyond the edge of the paper. Pass out black square and have the students write their name on the back (with white crayon or pencil). Glue their picture so it is centered on the black square.
-have students clean up their area: paper in trash, paint supplies put away, and glue bottles collected
*have parents wash out paint brushes and lay on art room counter to dry
*put extra black paper strips in Ziploc bag and put in second grade file cabinet drawer
* NOTE: In this project we are trying to make our images as much like the inspiration pieces as possible. We want the kids to make their pictures very much in the style of Mondrian. That is why they will be following Mondrian's own rules of straight lines and primary colors.
1. Show students some pictures of compositions by Mondrian. Talk about what they see: straight lines, squares and rectangles, blocks of color. Go over Mondrian's ideas about why he painted his works this way. Talk about math and geometry. Teach the term "geometric" (regular shapes like squares, triangles and circles). Mondrian only used squares and rectangles.
2. Show students the sample you made. Remind them that their name goes on the back of the black paper, which will be handed out when they are ready. Talk about how you drew the lines in pencil first with a ruler to make sure they were straight. Point out that some areas can be left large and some can be divided into smaller rectangles. Emphasize that the squares should not be too small (or when they add the black strips there will be no color left), and that a simple grid is very effective in this case. There is no need to get too complicated with their design (though many will be tempted).
3. Remind them of the term "primary colors," which they should have learned in earlier grades. Tell them that, like Mondrian, they will only use the primary colors of red, yellow, and blue in their art today. Point out how important the white squares are in the design. Show how you left white squares on your own sample, and ask them to think about which squares they will leave white on their own grid.
4. Demonstrate how to glue on the strips of black paper over your pencil lines when you were done painting, to outline the grid (remind them to use the glue: "dot, dot, not a lot"). Show them they can cut the strips if they are too long for their lines.
Art Project
-pass out white paper to students and rulers
-have students use their ruler and their pencil to draw straight lines going up and down and across their paper.
-as they are drawing their lines remind them to think about what squares they want to paint.
-have students raise their hands when they are done with their pencil lines.
-have parent volunteers check to make sure they followed the directions (parents may want to erase a line or two if the student has been a bit too ambitious or have created shapes that just wont work).
- pass out paint palettes with primary colors and a paint brush and water container to kids that are ready to paint
-students can share paint palette and water containers
-have students raise their hand when they are done painting so parents can remove paint supplies
-pass out black paper strips for students to glue down over pencil lines. Remind students that the strips do NOT need to go around the outside edge because you will be mounting the painting on a black square
-pass out glue bottles to glue down strips
-trim any strips that go beyond the edge of the paper. Pass out black square and have the students write their name on the back (with white crayon or pencil). Glue their picture so it is centered on the black square.
-have students clean up their area: paper in trash, paint supplies put away, and glue bottles collected
*have parents wash out paint brushes and lay on art room counter to dry
*put extra black paper strips in Ziploc bag and put in second grade file cabinet drawer
Citations:
- Piet Mondrian, Composition 2 1922. www.wikiart.org, https://www.wikiart.org/en/piet-mondrian/composition-2-1922
- Piet Mondrian, Composition 2 1929. www.wikiart.org, https://www.wikiart.org/en/piet-mondrian/composition-2
- Piet Mondrian, Victory Boogie Woogie 1944. www.wikiart.org, https://www.wikiart.org/en/piet-mondrian/victory-boogie-woogie-1944
- Piet Mondrian, Trafalgar Square 1939-1943. www.wikiart.org, https://www.wikiart.org/en/piet-mondrian/trafalgar-square-1943
- Piet Mondrian, Composition A 1923. www.wikiart.org, https://www.wikiart.org/en/piet-mondrian/composition-a-1923
- Piet Mondrian, Composition with Large Red Plane, Yellow, Black, Gray and Blue 1921. www.wikiart.org, https://www.wikiart.org/en/piet-mondrian/composition-with-large-red-plane-yellow-black-gray-and-blue-1921
- Piet Mondrian, Tableau I 1921. www.wikiart.org, https://www.wikiart.org/en/piet-mondrian/tableau-i-1921
