Sixth Grade
Egyptian Portraits
When we look at Ancient Egyptian art, it looks remarkably the same for nearly 3000 years. All the human figures have a consistency to them, plus the hieroglyphs are also easy to notice, even if we don't know how to read them. When the 6th grade students studied Mesopotamian history, they learned about how desirable the fertile land was between the Tigris and Euphrates Rivers, and how different rulers conquered each other for more territory and power. The Egyptian culture existed at the same time as the Mesopotamians and they had an equally fertile land because of the great Nile River. However, Egypt had more natural defenses surrounding it, like the Mediterranean Sea, mountains and deserts, so they were able to repel invading armies and maintain a long and consistent rule. While Mesopotamian art evolved over time based on the different rulers and cultures, the Egyptians preserved their own styles, beliefs and ways of life over thousands of years.
Here are some hints at understanding Egyptian figure painting:
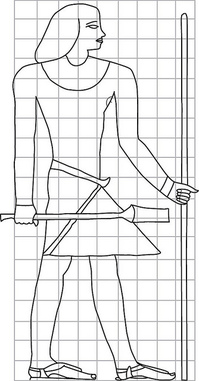
1. CANON OF PROPORTIONS - bodies were drawn or sculpted based on the same mathematical scheme, called the canon of proportions (based on what they thought was most beautiful and pleasing). Because everyone was using the same formula, most Egyptian people look very much the same.
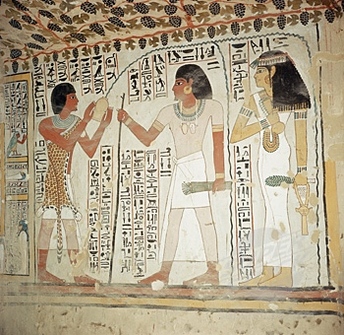
2. TWISTED PERSPECTIVE - when the Egyptian artists were painting three dimensional figures on a flat surface (as opposed to sculpture), they relied on multiple viewpoints to tell the clearest story. For example, if you look at a human body, the face is much more distinctive in profile (from the side), but the eye is not. The eye is much clearer from the front. The same goes for the torso (front), and arms and legs (side). This is called twisted perspective because we are showing multiple viewpoints at the same time. All the Egyptians did it.
3. HIERARCHICAL SCALE - another thing to look for is discrepancy in the size of figures in the same scene. Some figures will be much bigger than the others (and not just because they are taller or to fit the space better). We call the difference in size, "scale." They Egyptians used what is called "hierarchical scale" to show the relative importance of the different people in a scene. The most important people are the largest, say the pharaoh or the gods, while the servants or children would be much smaller.
4. SYMBOLS - Even though most Egyptian citizens could not read writing, they were easily able to recognize and understand symbols. Ancient Egypt symbols were featured in hieroglyphics, as well as images and pictures. The symbols for Egypt typically relate to the gods, life, love and death.
1. CANON OF PROPORTIONS - bodies were drawn or sculpted based on the same mathematical scheme, called the canon of proportions (based on what they thought was most beautiful and pleasing). Because everyone was using the same formula, most Egyptian people look very much the same.
2. TWISTED PERSPECTIVE - when the Egyptian artists were painting three dimensional figures on a flat surface (as opposed to sculpture), they relied on multiple viewpoints to tell the clearest story. For example, if you look at a human body, the face is much more distinctive in profile (from the side), but the eye is not. The eye is much clearer from the front. The same goes for the torso (front), and arms and legs (side). This is called twisted perspective because we are showing multiple viewpoints at the same time. All the Egyptians did it.
3. HIERARCHICAL SCALE - another thing to look for is discrepancy in the size of figures in the same scene. Some figures will be much bigger than the others (and not just because they are taller or to fit the space better). We call the difference in size, "scale." They Egyptians used what is called "hierarchical scale" to show the relative importance of the different people in a scene. The most important people are the largest, say the pharaoh or the gods, while the servants or children would be much smaller.
4. SYMBOLS - Even though most Egyptian citizens could not read writing, they were easily able to recognize and understand symbols. Ancient Egypt symbols were featured in hieroglyphics, as well as images and pictures. The symbols for Egypt typically relate to the gods, life, love and death.
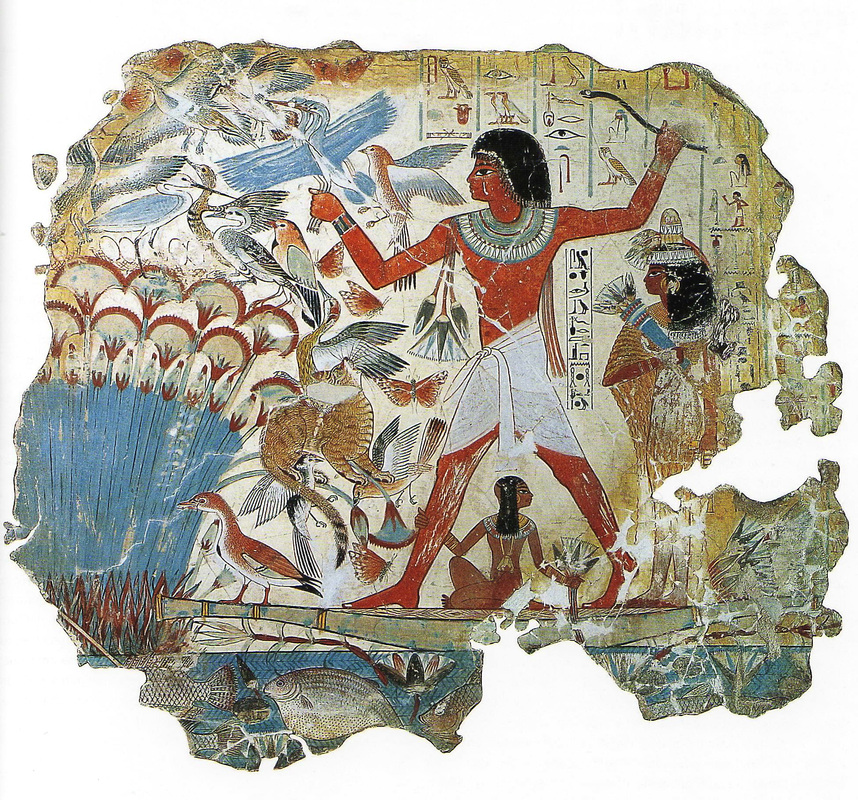
"Fowling Scene" from the Tomb of Nebamun
|
PowerPoint that can be used when teaching this lesson:
|
| ||
|
Egyptian symbols Handout:
|
| ||
The Project
Prep - 30 min. (includes making sample)
Materials
- oil pastels for each student (they will only use black)
- chalk pastels for each student
- 9 x 12" black construction paper per student
- Egyptian symbols handouts (students can share) - download link above
Lesson
1. Show images above and talk about the symbols, canon of proportions, twisted perspective, and hierarchical scale (defined above). These are all aspects that you will find when looking at Egyptian art.
2. One of the most interesting things about Egyptian art is that it really didn't change for practically 3000 years! This is unheard of in any other culture of art. It is by the different uses of materials and depictions of rulers that we can tell what period the art in Egypt was created.
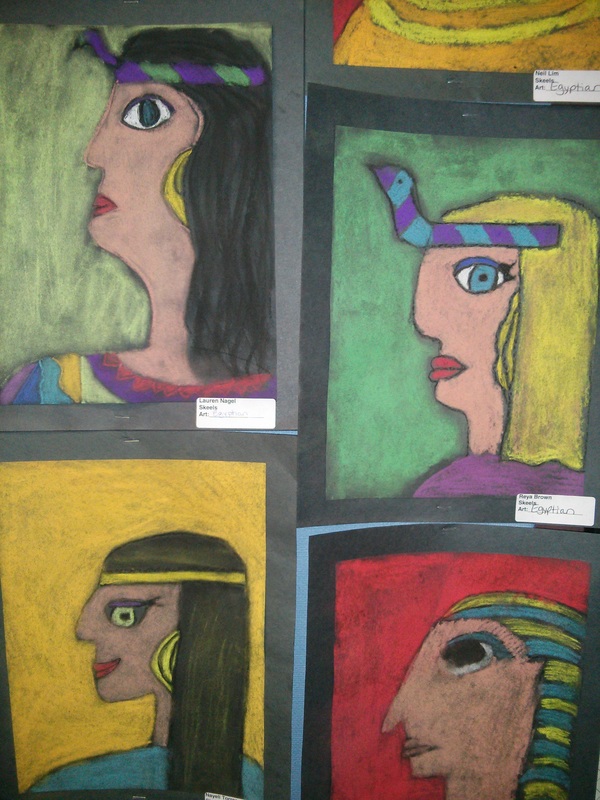
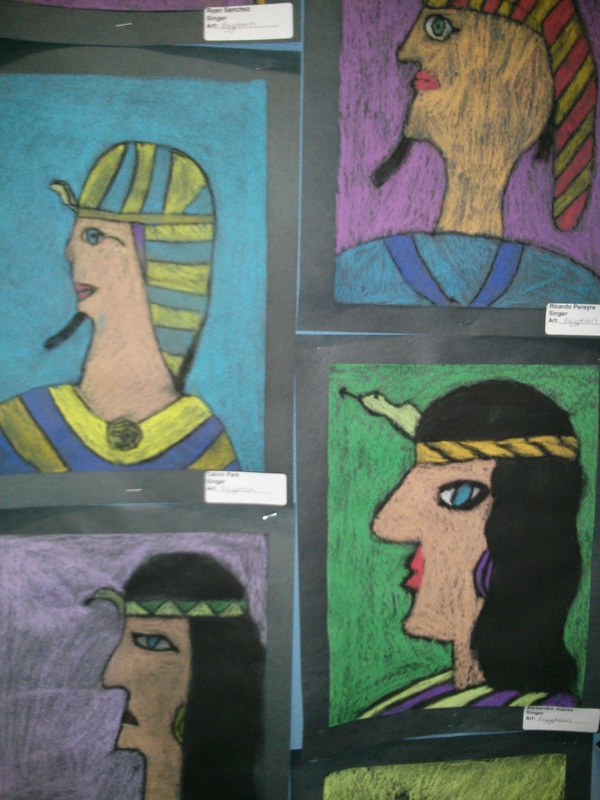
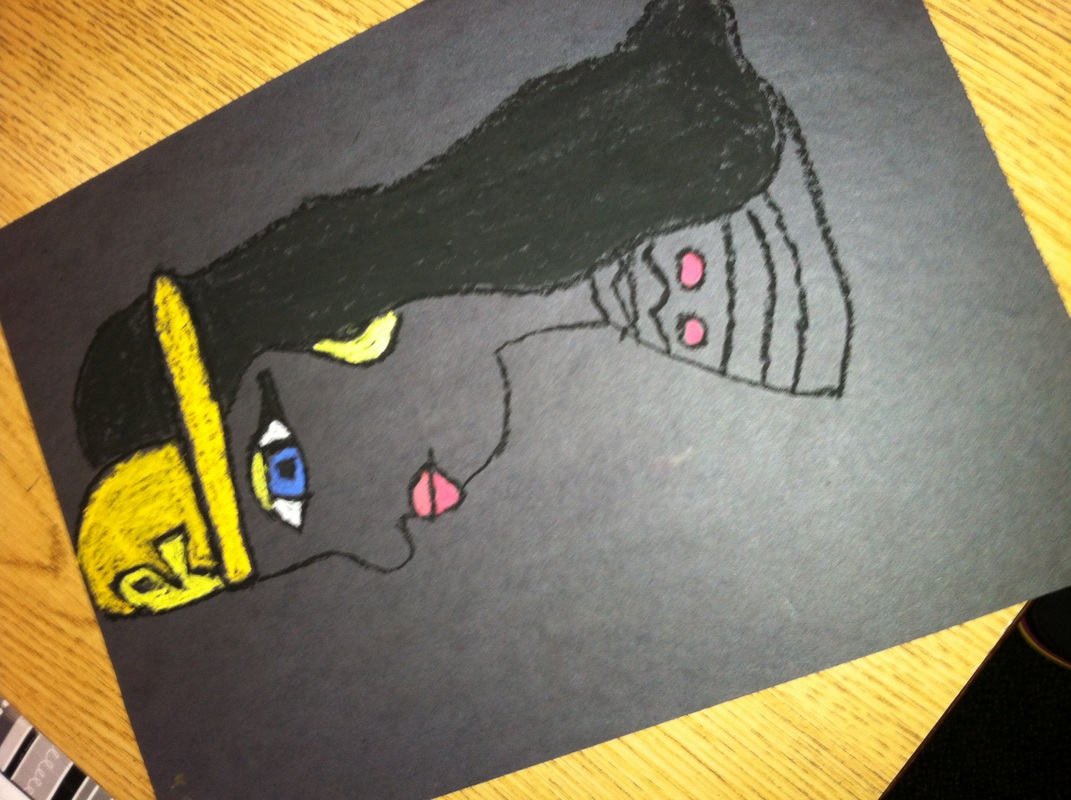
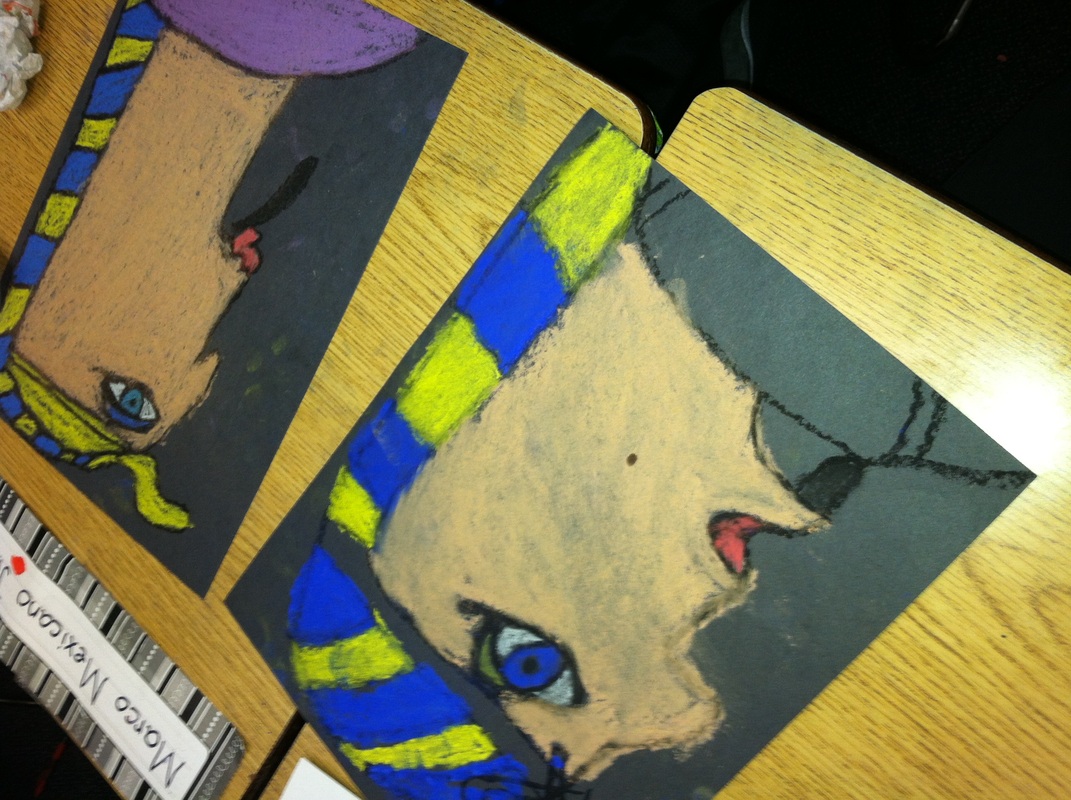
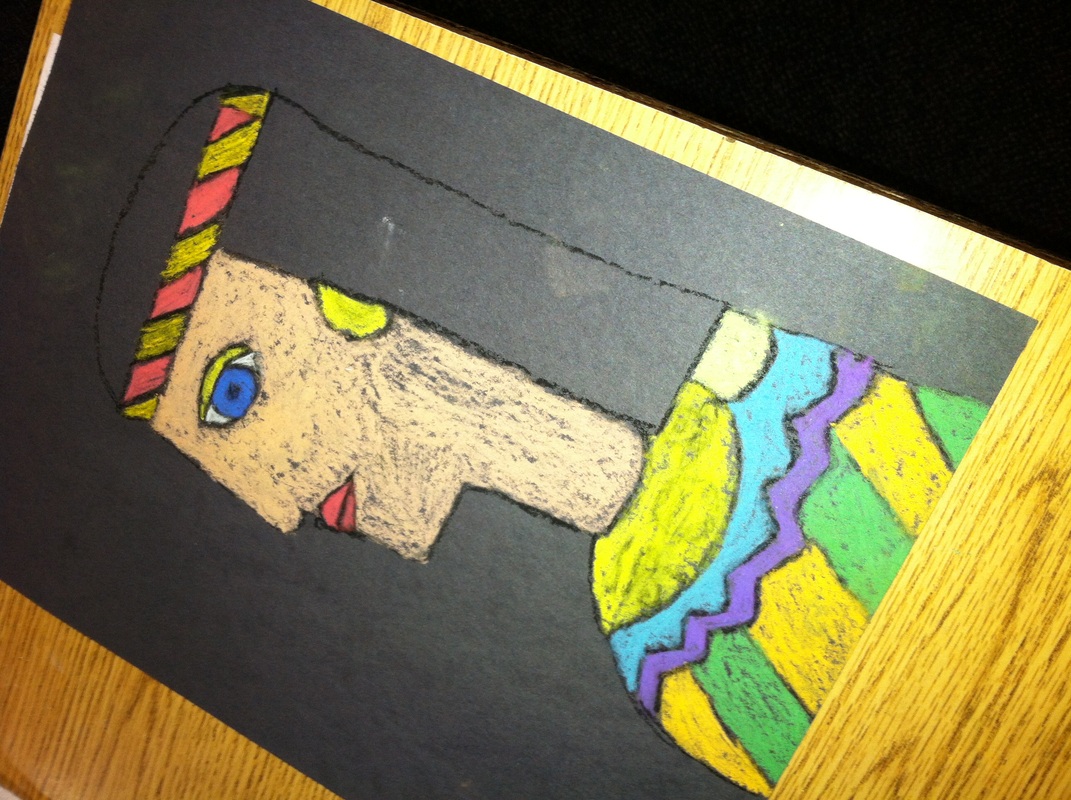
3. Show the students your sample. Talk about how you created this Egyptian self-portrait in profile - from the side of the head - but the eye from the front. Explain that you drew your profile in pencil on black construction paper, traced over it with black oil pastel, then added color with chalk pastels.
4. Ask students the difference between chalk and oil pastels (good comprehension check from 5th grade lesson). Oil pastels are a mixture of oil with a wax binder and chalk pastels are made from chalk. Chalk pastels blend and transfer easily and oil pastels do not.
5. Pass out Egyptian symbols handouts and go over what some of the symbols mean with the class. Talk about how Egyptian headdresses were very symbolic, usually identifying the wearer with their role of power (pharaoh, deity, ruler, queen, mother, etc.). Tell them they may use the different symbols in their drawings.
Art Project
-pass out black paper to each student and tell them to use it vertically (don't forget name on back, use white oil pastel)
-have students draw their self-portrait in pencil and raise their hand when they are done so a parent helper can pass out oil pastels
-remind students they are only using the black oil pastel to trace over their pencil drawings
-when students are done with black oil pastel tracing, have them turn them in and give them a box of chalk pastels
-as students work, remind them to take their time with their chalk pastels and be careful not to smear the colors.
-the black oil pastel will help keep the chalk pastels separate and will keep them from smearing
-finish by coloring in the background (smearing is especially useful here), and adding any other symbols, tokens or hieroglyphics they desire.
-when students are done have them turn in all supplies
NOTE: the pictures can be sprayed with hairspray (outdoors please!) to keep the chalk from smearing excessively. Oak Ridge teachers like to laminate this project so spraying may not be necessary.
*please put all art supplies away in the art room
Materials
- oil pastels for each student (they will only use black)
- chalk pastels for each student
- 9 x 12" black construction paper per student
- Egyptian symbols handouts (students can share) - download link above
Lesson
1. Show images above and talk about the symbols, canon of proportions, twisted perspective, and hierarchical scale (defined above). These are all aspects that you will find when looking at Egyptian art.
2. One of the most interesting things about Egyptian art is that it really didn't change for practically 3000 years! This is unheard of in any other culture of art. It is by the different uses of materials and depictions of rulers that we can tell what period the art in Egypt was created.
3. Show the students your sample. Talk about how you created this Egyptian self-portrait in profile - from the side of the head - but the eye from the front. Explain that you drew your profile in pencil on black construction paper, traced over it with black oil pastel, then added color with chalk pastels.
4. Ask students the difference between chalk and oil pastels (good comprehension check from 5th grade lesson). Oil pastels are a mixture of oil with a wax binder and chalk pastels are made from chalk. Chalk pastels blend and transfer easily and oil pastels do not.
5. Pass out Egyptian symbols handouts and go over what some of the symbols mean with the class. Talk about how Egyptian headdresses were very symbolic, usually identifying the wearer with their role of power (pharaoh, deity, ruler, queen, mother, etc.). Tell them they may use the different symbols in their drawings.
Art Project
-pass out black paper to each student and tell them to use it vertically (don't forget name on back, use white oil pastel)
-have students draw their self-portrait in pencil and raise their hand when they are done so a parent helper can pass out oil pastels
-remind students they are only using the black oil pastel to trace over their pencil drawings
-when students are done with black oil pastel tracing, have them turn them in and give them a box of chalk pastels
-as students work, remind them to take their time with their chalk pastels and be careful not to smear the colors.
-the black oil pastel will help keep the chalk pastels separate and will keep them from smearing
-finish by coloring in the background (smearing is especially useful here), and adding any other symbols, tokens or hieroglyphics they desire.
-when students are done have them turn in all supplies
NOTE: the pictures can be sprayed with hairspray (outdoors please!) to keep the chalk from smearing excessively. Oak Ridge teachers like to laminate this project so spraying may not be necessary.
*please put all art supplies away in the art room