Kindergarten
Clay - Handprint
This project is different than the others. The handprints will be made individually with the children by pulling 2-3 students out of class at a time to make their handprint. This is NOT a whole class project.
tHE pROJECT
Talk to the teacher to schedule a good time for the parent volunteers to come and help make the handprints. You do not need to do any presentation (although there is an optional short discussion about handprints you can use at the bottom of this page, if desired). The teacher will most likely pick a time when the class is working on something else, but will allow for the children to come out a few at a time. (Another option is to bring in coloring sheets for the children to work on when it is not their handprint turn - check Kindergarten file cabinet drawer for coloring sheets.)
Prep Time – about 2 hours (or less if you get extra helpers)
Materials
-White clay rolled out to ½ inch slabs, large enough to fit coffee can cutter for each student
-Clay cotton cloth pieces, one per piece of clay
-Wire clay cutter
-toothpicks or unwound paperclips for writing child's name in clay
-Straws to make holes at top for hanging
-Clear glaze for each handprint
Volunteer Prep
Clay is our most time consuming project for each grade level. It does take time, but this project will last forever and is worth it!
Choose a day when other parents can come and help you roll out the clay. You can roll it out before the lesson or up to 3 days before the lesson.
Roll out a ½ inch piece of clay for each student that the large coffee can cutter will fit on. It is easiest to roll the clay on a piece of cotton cloth found in the drawers near the freezer.
Steps
-put a piece of moist (not wet) cloth down on the granite clay cart.
-Use wire cutter to cut a piece of clay off of clay block.
-lay on moist cloth, put another moist cloth over it and use rolling pin and wood measuring guides to roll out clay to desired thickness.
-Use coffee can to cut out circle clay and use your fingers with a little water to smooth edges so they are rounded.
-repeat!
-you can place each rolled out slab of clay on a cloth in a large Ziploc bag.
-I lay 3 pieces of rolled out clay, each with a cloth on the bottom, on top of each other in bag. If you are rolling out clay 2-3 days in advance, seal bag when you are done.
-always make a few extra circles, in case they are needed
WARNING: DO NOT ALLOW CLAY TO GO DOWN YOUR DRAIN!
For more information on working with clay, see our media page on clay.
For more information on working with clay, see our media page on clay.
Making the handprints
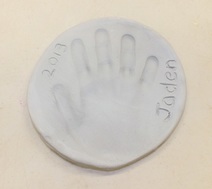
Call out 2-3 children to the kindergarten tables. Working one at a time, help the child gently set their hand on the clay slab, spreading their fingers a little as necessary. When you are happy with the position, help them press down more firmly into the clay by using your own fingers to push down on their hand. Press firmly enough to leave an impression of their hands in the clay, but not so hard that you start to squish out the shape of the circle.
Using a toothpick or unrolled paper clip write the child's first name along the edge of the circle so it doesn't interfere with the handprint. Include the year as well. Confirm with the student the spelling of their name, but the adult should do the writing, not the child.
Using a straw, poke two holes about a half inch to an inch apart at the top of the circle, again being careful to avoid the actual handprint. These holes will be used to attach ribbon or wire so the finished handprints can be hung on a wall.
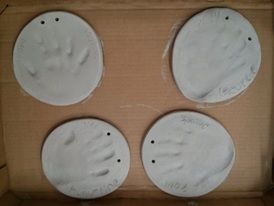
Lay the prints carefully in a flat box to take back to the art prep room to dry. Single layer only. Do not stack wet clay at this point.
When you and your helpers have finished with one batch of children, send them back in the room to call out the next batch. Continue until all students have made their handprint.
Stow your boxes of clay handprints in a safe spot (under the rolling cabinets works well) to dry for at least 10 days before the first firing. Sign up on the kiln calendar to reserve your spot for when they are dry.
After the first firing, you will need to glaze each handprint with clear glaze (recruit your parent helpers again!), making sure you paint the glaze on the top and sides ONLY. Any glaze that seeps to the bottom will need to be wiped off with a sponge before firing or it will stick to the kiln. Schedule your second firing.
After the glaze fire, you can finish up with ribbon or wire strung through the holes you made. Often bags or boxes can be decorated by the children so the finished handprints can be presented as gifts for Mother's Day or other special occasion.
OPTIONAL art lesson about prehistoric handprints
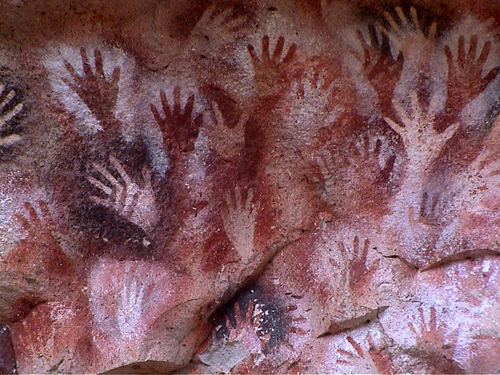

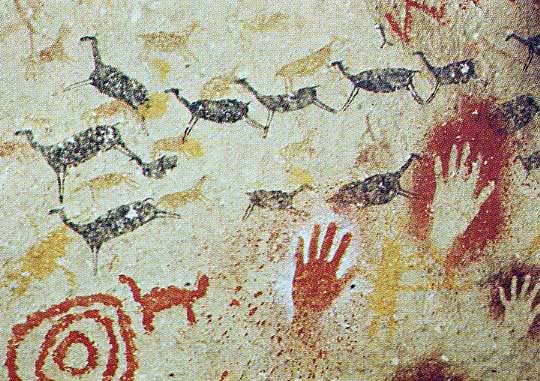
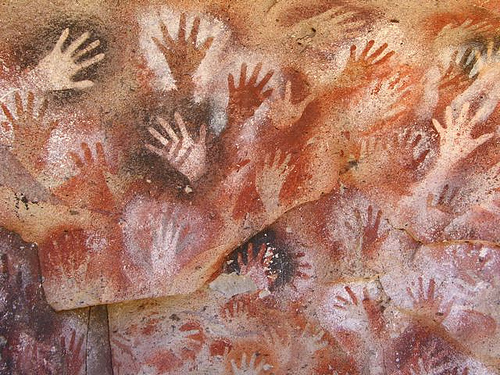


Hand paintings are depicted in Rock Art around the world. The hand image would have been created in a variety of ways: the artist may have used the hand on the rock as a stencil, spraying paint from the mouth or charcoal powder through a reed; the outline of the hand may have been painted around by brush; or simply painting the hand and then placing it on the rock. The hand paintings were created by men, women and children. What ever the method, and what ever the style of accompanying art, hand paintings are one of the most common elements of rock art.
Why the handprints are there is less certain. It could have been a signature, or just a mark of their presence or existence. Perhaps it was related to healing or some other religious or ritual experience.
Ask the children how they like to make handprints - tracing them on paper, pressing in the sand or mud, out of play dough, using paint to make a print, etc. Then have them consider why they like to do it - it is fun, easy, shows how much they grow over time, etc. Have them also consider that handprints are sort of like a self portrait, an expression of themselves. Our hands are unique, like our fingerprints. Have the children consider their hands, including lines on the palm, shape and size of fingernails, their knuckles, etc.
Then you can explain how in this project they are going to leave their handprints in clay, which when fired will get hard and become a permanent reminder of who they are as kindergarteners.
