Fourth Grade
Youtube Video Links -
History - youtu.be/him33GxYm20 Demo -
History - youtu.be/him33GxYm20 Demo -
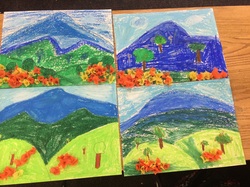
California Impressionism, Landscape with Poppies
Starting in the 1860s in Paris, France, a group of artists got together to exhibit their paintings of the world around them, including a lot of scenes of nature. These artists were excited about how "modern" the world was becoming, and they wanted to paint in a new, modern, way as well. They wanted their art to be fresh and vibrant, so instead of spending hours in their art studio perfecting and polishing their paintings, they took their canvases outside, and painted with short, quick brushstrokes, trying to capture the colors and lighting qualities of the moment. Indeed, because they wanted to get that first impression of a moment down on canvas before the light changed, these artists became known as "Impressionists." (See also 1st grade project, Monet "Water Lilies.")
At first, the public didn't like the "messy" paintings of the Impressionists. But it didn't take long before their style caught on, and many other artists started using the same techniques and styles to make their art, or to adapt it for their own uses. Fourth graders studying California history might especially enjoy knowing that a whole group of artists adopted this style in the early 20th century and started a movement that became known as California Impressionism.
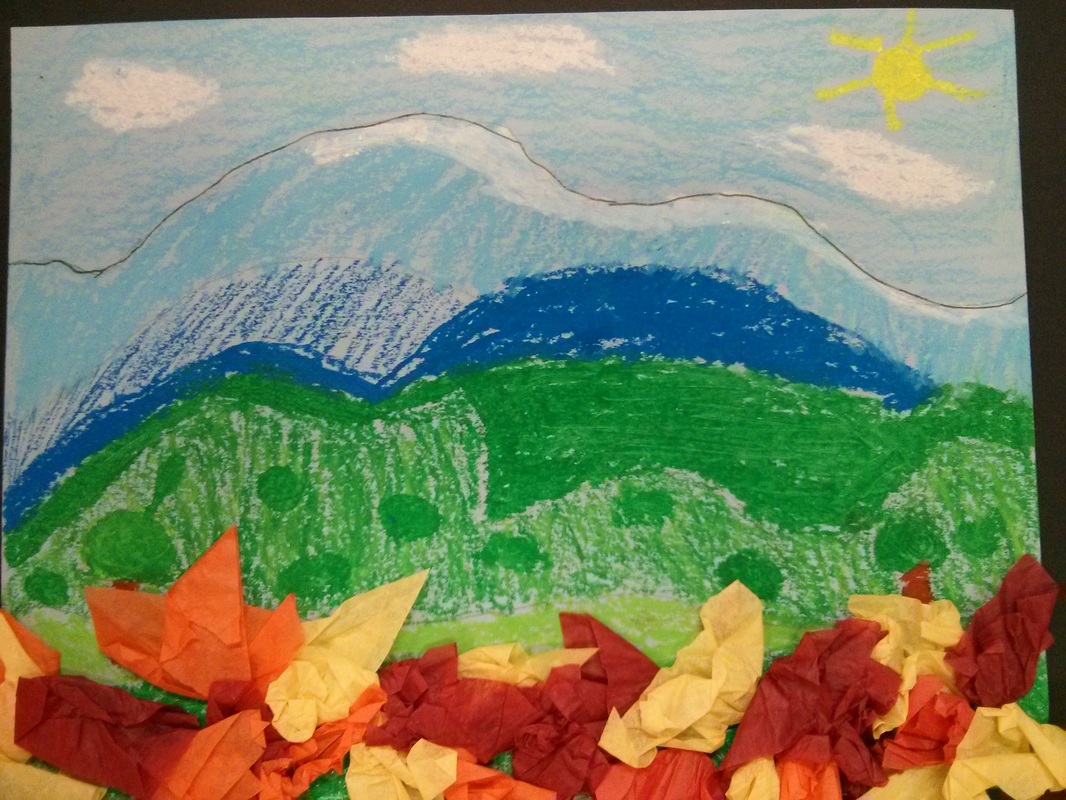
The California Impressionist artists depicted the California landscape — the foothills, mountains, seashores, and deserts of the interior and coastal regions. They painted the beautiful California scenery using the same approach as the French Impressionists: painting directly outdoors, with bright colors and loose brushwork. All of the examples shown below also include fields of the state's flower, the poppy! Look at the variety of natural elements in the pictures, from hills and mountains, to the ocean, trees, bushes, and of course the flowers. Point out how the short brushwork that the artists used is very noticeable in the pictures, making the images look a bit blurry or unfinished. This is exactly the quality that they liked! Also note how when we look at scenes of the nature, the artist can make it look more real by making the things in the "front" look closer by making then brighter, darker and more vivid. Then there is usually a middle ground that is a little less bright, as well as a background that starts to look less distinct with fewer details and lighter colors. This art project will try to recreate that effect.
At first, the public didn't like the "messy" paintings of the Impressionists. But it didn't take long before their style caught on, and many other artists started using the same techniques and styles to make their art, or to adapt it for their own uses. Fourth graders studying California history might especially enjoy knowing that a whole group of artists adopted this style in the early 20th century and started a movement that became known as California Impressionism.
The California Impressionist artists depicted the California landscape — the foothills, mountains, seashores, and deserts of the interior and coastal regions. They painted the beautiful California scenery using the same approach as the French Impressionists: painting directly outdoors, with bright colors and loose brushwork. All of the examples shown below also include fields of the state's flower, the poppy! Look at the variety of natural elements in the pictures, from hills and mountains, to the ocean, trees, bushes, and of course the flowers. Point out how the short brushwork that the artists used is very noticeable in the pictures, making the images look a bit blurry or unfinished. This is exactly the quality that they liked! Also note how when we look at scenes of the nature, the artist can make it look more real by making the things in the "front" look closer by making then brighter, darker and more vivid. Then there is usually a middle ground that is a little less bright, as well as a background that starts to look less distinct with fewer details and lighter colors. This art project will try to recreate that effect.
The Project
Prep – 45 min. (includes making sample)
Materials
9 x 12 piece of light blue construction paper for each student
Oil pastels for each student
Small pieces of orange and yellow tissue paper cut in ½ inch squares
Pencils to use eraser to glue down tissue poppies
Glue bottles
Coffee filters
Lesson
Art Project
-pass out paper to students, tell them they will use it horizontally and to put their name on the back
-have students use their pencils to draw their background, foreground, and middle ground
-pass out oil pastels so students can get started coloring in their landscape
-remind them to use 2-3 colors on each area of the landscape to show light and contrast
-when they are done have them raise their hand so parents can check to see if they used different colors to create light and contrast and that they colored in the whole paper
-pass out tissue paper squares in coffee filters
-pass out glue bottles
-pass out pencils to use erasers to help glue on poppies
*put any extra tissue paper in a bag back in cupboard in Art Room
*have parent helpers help put away art supplies in Art Room
Materials
9 x 12 piece of light blue construction paper for each student
Oil pastels for each student
Small pieces of orange and yellow tissue paper cut in ½ inch squares
Pencils to use eraser to glue down tissue poppies
Glue bottles
Coffee filters
Lesson
- Ask students what they know about Impressionism. Ask them if they remember Monet from the first grade project, or even van Gogh, who was a post-Impressionist. Explain that the influence of impressionism spread to California. Show the pictures of California Impressionism. Ask the students if they can identify which region of California the pictures show (they study this during the latter part of the school year). Point out the quick brushwork, talk about painting outdoors, and discuss the concepts of foreground, middle ground, and background.
- Show students your sample. Talk about background, foreground, and middle ground of art work. Show students how to draw in their background, middle ground, and foreground with a pencil. Use 2-3 colors of oil pastels to create an Impressionistic look on the land. Example: dark blue, then add light blue and white on top to create light and contrast on mountains. The same can be done with the green grass that poppies go on.
- Explain that every part of the paper should be colored in with oil pastels.
- Show students how to use the squares of tissue paper to make a poppy field at the bottom or foreground of their paper.
Art Project
-pass out paper to students, tell them they will use it horizontally and to put their name on the back
-have students use their pencils to draw their background, foreground, and middle ground
-pass out oil pastels so students can get started coloring in their landscape
-remind them to use 2-3 colors on each area of the landscape to show light and contrast
-when they are done have them raise their hand so parents can check to see if they used different colors to create light and contrast and that they colored in the whole paper
-pass out tissue paper squares in coffee filters
-pass out glue bottles
-pass out pencils to use erasers to help glue on poppies
*put any extra tissue paper in a bag back in cupboard in Art Room
*have parent helpers help put away art supplies in Art Room